All Kumospace Floor templates are fully editable and allow you to personalize your finishing touches.
Edit menu
Kumospace hosts, co-hosts, floor managers, and members* can access the Edit menu on the top right of the screen.
Clicking it will reveal the Furniture and Rooms tabs, both of which contain a number of categories.
*Floor editing can be restricted for members on the Settings tab set by Owner or Floor Managers.
Rooms
Rooms in Kumospace have private audio zones, separate from spatial audio ranges available on the rest of the Floor. Everybody can hear each other no matter how far apart they are in the Room.
Add a Room to your Kumospace
-
Open the Edit menu by clicking on the chair icon on the top right or pressing E on your keyboard.
-
Select the Rooms tab, then click the Rooms dropdown.
-
Click the Empty Room object to select it, then click on where you want to place it.
You can resize Rooms by dragging the corners to your desired size.
Customize your Rooms
You can change the look of your Rooms by adding different flooring, wall finishes, windows, and doors.
- Open the Edit menu by clicking the chair icon on the top right or pressing E on your keyboard.
- Select the Rooms tab, then click the Flooring or Walls dropdowns.
- Choose the finish you want to select, then click on the part of the Room you'd like to place it.
You can hold Shift to continue using an object without having to click to select every time. To deselect, stop holding Shift or click into the Edit menu.
Use R to rotate the furniture you are holding.
Group Furniture with Rooms
To link furniture items with the room it is placed in, you'll need to group the furniture with the room:
- Open your Edit tab.
- Click the Show grid overlay button in the top-left corner of the Customize menu.
- Tick the Group Furniture with Room box.
This will allow you to move an entire room while maintaining the furniture placement, or delete a room along with all of the items inside.
Doors
You can close and open the door from inside the Room by clicking on it.
Click on the door from the outside to "knock" and be let in.
Audio zones
As mentioned, Rooms are in fact audio zones. To remove the walls of a Room, but keep the audio zone, add the (Remove Wall) object from the Walls dropdown to the parts of the wall you'd like to erase.
Room templates
To speed up building your Floors, you can add furnished Room templates to your Kumospace.
To add a Room template:
- Open the Edit menu and click the Rooms tab.
- Select the Rooms dropdown.
- Choose a Room template, then click on where you want to place it.
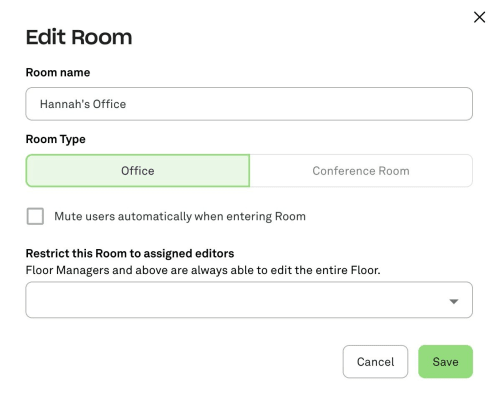
Room Settings
While your Edit menu is open and the Room tab is selected, hover over your chosen Room to reveal the Settings button. From here you can rename your Room, making it appear as a location in the Chat menu.
Furniture
You can further customize your Floor templates in Kumospace by adding furniture, games, and interactive objects like the YouTube TV, Whiteboard and Custom Links tablet.
-
Open the Edit menu.
-
Select the Furniture tab.
-
Choose one of the following dropdowns:
-
Seating: This dropdown displays an array of sofas, chairs, benches, loungers, stools, as well as pool floats.
-
Tables: This dropdown allows you to view tables, counters, bar furniture, and our popular DJ booth.
-
Decor: Click this dropdown to choose from a variety of drink trays, pizza, pastries, and sushi. There's also statues, sculptures, and other decorative objects.
-
Plants: Add greenery to your space from this dropdown, where you can find everything from succulents to tomato and lettuce plants.
-
Ground: This dropdown includes partial flooring options, like ocean waves and various terrains, as well as a stage, a fountain, and audio circles.
-
Rugs: Add coziness or color to your Space by placing a welcome mat, one of our vibrant rugs, or a beach blanket.
-
Activities: Click this dropdown to access our interactive apps - the YouTube TV, Whiteboard, Chess, Codenames, and more various instruments.
-
Seasonal: This dropdown changes with the seasons, and contains objects such as pumpkins, snowmen, or New Year's party balloons.
-
Custom: Click this dropdown to add custom images and Gifs to your space, customizable signs, and our Custom Link tablet.
Add furniture
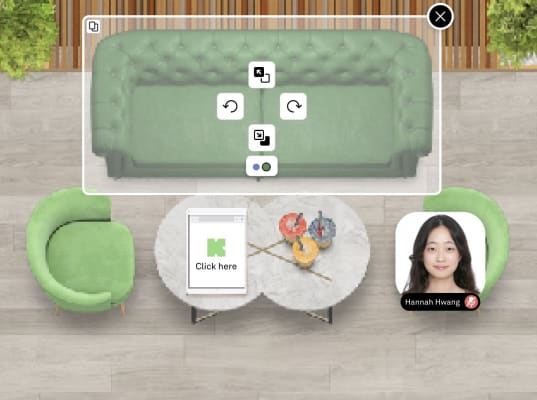
Once you find the furniture you want, click on it to select, then click on where you'd like to place it. No heavy lifting required!
Click the curved arrow ⟳ buttons to rotate most furniture items, and set the elevation of your furniture, e.g. sofa above carpet, and table below plant.
Click the x in the top-right corner of the furniture to delete it.
Note that as long as the Edit menu is open, you will be in edit mode, and can make changes to your furniture and space. You can even do so in real time, during an event.
Remove Furniture
To remove furniture, open the Edit menu and use your pointer to hover over the item you would like to delete. Click the X icon in the top right corner to delete the item.
Furniture variations
Furniture items can have multiple variations such as different colors or patterns.
To view the different variations, hover over the circles found underneath certain furniture items. The preview image of the furniture item will change as you hover over different circles.
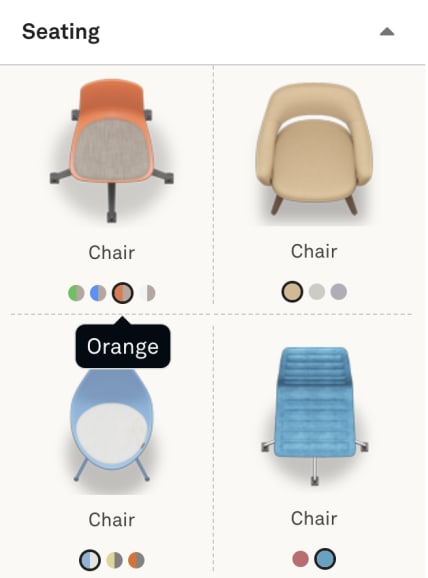
To select a specific furniture variation, click on the circle. Then add the furniture item to your Space by clicking the image of the item and clicking on the Floor where you would like to place it.
Furniture settings
Some objects, like the Custom Link tablet, will display a Settings button when you hover over them with your mouse while in edit mode.
Click the Settings button to adjust the settings of your furniture.
Search furniture
You can also quick-search all the furniture to make editing your Floors easier:
- Open your Edit menu.
- Click the Search furniture field at the top.
- Enter your keyword, e.g. the color or item you’re looking for.
Snap furniture to grid
To help you align furniture and other objects perfectly, our handy Grid function is on by default. If you prefer to customize your space without the Grid function, you can turn it off:
- Open your Edit tab.
- Click the Customize button in the top-left corner.
- Untick the Snap furniture to grid box.
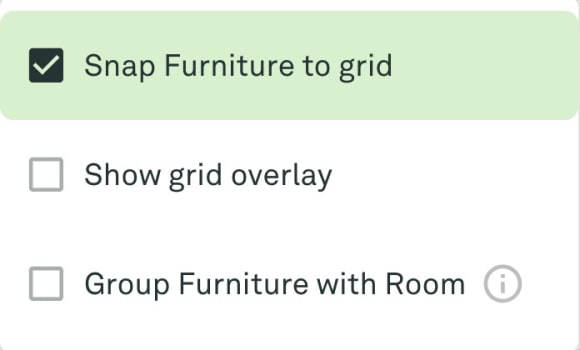
You can also turn off the grid overlay which appears while you're in edit mode by unticking the Show grid overlay box.