Looking for the easiest way to record your screen? From quick how-tos to full tutorials, this guide breaks down the best screen recording tools and tips. Whether you’re sharing gameplay, walking through a project, or creating content, you’ll find the simplest ways to start recording today.
Key Takeaways
- Choosing the right screen recorder, like ScreenRec or OBS Studio, is crucial for high-quality recordings and ease of use across platforms.
- To ensure professional-looking videos, focus on capturing high-quality audio and video, and utilize tools that allow you to record both screen and webcam.
- Effective management, organization, and security of recordings, along with leveraging analytics, enhance viewer engagement and content accessibility.
Choose the Right Screen Recorder
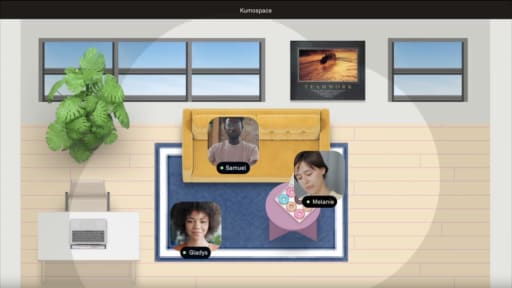
If you’ve ever wondered how do you do screen recording during a meeting, the answer is simpler than you think. Instead of downloading a separate screen recorder or juggling multiple apps, Kumospace lets you record for screen directly inside your virtual workspace.
With Kumospace, you can easily capture from the screen while hosting a meeting, running a workshop, or presenting to clients. This built-in screen recording capability means you don’t need third-party tools or extra logins.
Key benefits include:
- Seamless screen recorder integration so you can save and share meetings without switching apps.
- Cloud storage that keeps your recordings secure and easy to access.
- High-quality video and audio so every presentation, demo, or training session is clear.
By choosing Kumospace, you get a powerful screen recorder that makes it effortless to document and share what matters most.
How to Start Recording Your Screen
Once you know the steps, starting your screen recording in Kumospace is simple. Instead of relying on a separate screen recorder, you can use Kumospace’s built-in tools to record for screen directly during a meeting.
To begin, navigate to the meeting controls and select the recording option. From there, you can decide whether to capture from the screen in full, record just a shared window, or focus on a single browser tab. This flexibility makes it easy to tailor your screen recording to fit your exact needs, whether you’re running a training session, presenting to clients, or hosting a team demo.
Kumospace also gives you options to customize your recording settings, like including system audio or capturing the mouse cursor for added clarity. If you’re asking how do you do screen recording for tutorials or walkthroughs, these settings ensure your audience doesn’t miss a step. You can even enhance your session with a quick screen capture to save key moments as images.
Follow these simple steps in Kumospace:
- Start your meeting and select the record option.
- Adjust your settings for audio, screen area, or cursor visibility.
- Click the Start Recording button to begin.
- When finished, click Stop Recording, and your session will be saved securely in the cloud.
With Kumospace, your screen recording is stored in a safe, accessible space that makes sharing with teammates effortless. That means no extra apps, no clutter, and no missed moments.
Capture High-Quality Video and Audio
High-quality video and audio capture is key for professional-looking screen recordings. One of the first steps is to:
- Select a high-quality microphone.
- Use an external microphone, which often yields better sound quality than built-in computer microphones.
- Position the microphone close to the sound source to significantly improve audio clarity.
For even better sound quality, consider using a pop filter to reduce unwanted noise and enhance vocal clarity during recordings. Before you start recording, make sure to select the correct microphone source in your screen recorder’s settings. This will ensure that the audio is captured from the right device.
To improve your audio recording quality, consider the following tips:
- Enable the audio sharing option if you want to include audio in your recording.
- Adjust the audio input levels to prevent your recordings from being too quiet or distorted.
- Record in a quiet environment to reduce background noise and enhance overall audio quality.
Testing your microphone before recording is a good practice to ensure clear audio for viewers. This simple step can save you from having to re-record due to poor audio quality. By following these tips, you can capture high-quality video and audio that will engage your audience effectively.
Record Both Your Screen and Webcam

Recording both your screen and webcam can add a personal touch to your videos, making them more engaging. Before you start, you must allow the video recording tool to access your camera and microphone. This allows capturing both video and audio from your webcam.
Using tools like Kumospace, you can effortlessly record both your screen and webcam with a simple interface. For Windows users, OBS Studio allows detailed customization of the recording layout, enabling capture of different windows alongside the webcam feed in a single window. Such flexibility enables the creation of more dynamic and engaging videos using a screen capture tool, including those viewed in Microsoft Edge.
On Mac, QuickTime Player can be used to record your screen and webcam, with the option to make the webcam window float on top of other applications. Some tools also include built-in blur features to obscure sensitive information, enhancing security.
Edit and Save Your Recordings
The next step after recording your screen is to edit and save your recordings. Loom’s free screen recorder allows quick edits directly in the browser or mobile app. You can trim your recordings, splice clips together, and add details with a drawing tool, making it easy to refine your content.
If there are parts of the recording where the audio is not needed, you can mute the audio by clicking on the microphone icon on the clip. Additionally, the audio track of a screen recording can be detached to record audio for separate editing. Such features offer flexibility in editing, ensuring the final product meets your needs.
Once you’re satisfied with your edits, select the export button to save your edited screen recording as an MP4. MP4 is among the formats available for exporting your recordings, ensuring compatibility with most media players and platforms. These editing tools help polish your recordings for a professional presentation.
Share Your Screen Recordings Instantly
Instantly sharing your screen recordings enhances accessibility and communication. There are multiple ways to edit and share your recordings, such as via secure links that you can customize for privacy settings. This ensures that only intended recipients access the recordings.
Embedding your recordings in emails or websites can enhance communication and provide valuable feedback, leading to performance improvements and bug fixes. This is particularly useful for tutorials or presentations that need to be set with a broader audience to download voice.
Additionally, videos can be uploaded to cloud services for streamlined access and sharing. Such sharing options simplify and expedite content distribution.
Record Offline and Upload Later
Offline recording is crucial for those with unreliable internet connectivity. Users can save their recordings as local files when offline, which will wait to be uploaded to the cloud automatically once they reconnect to the internet. This ensures saving important content without internet concerns.
Recorded files can be processed and shared once online, without manual re-uploading. Some screen recording tools allow for seamless offline recording, ensuring that users can save their videos and record videos even without a stable connection. Such capability maintains productivity regardless of internet reliability, allowing users to file their recordings efficiently.
Ensure Security of Your Recordings
Securing your recordings is crucial. Encrypting recorded content ensures it remains unreadable without the correct decryption key, even if intercepted during transmission. This adds a layer of protection to your recordings.
Opting for cloud storage solutions that offer end-to-end encryption enhances the security of stored recordings, ensuring that only authorized users can access them. Password protection and restricted access also prevent unauthorized access to your screen recordings. These security measures are essential for protecting sensitive information.
Manage and Organize Your Content
Effective management and organization of your recordings significantly improve accessibility and retrieval. Tags should serve as additional context rather than replicate folder structures, aiding in easier navigation through video content. This approach makes it easier to find specific recordings when needed.
Avoid spaces or punctuation when creating tags to ensure proper indexing and ease of use. A well-organized content library enhances the efficiency of sharing and retrieving recordings. Effective content management streamlines workflow and improves productivity.
Utilize Analytics for Viewer Engagement
Tracking viewer engagement through analytics is crucial for understanding how well your content resonates with the audience. Detailed analytics offer insights into who watched the content and for how long, aiding in understanding viewer habits. This information is valuable for optimizing future recordings.
AI tools can assist in video creation by automatically generating summaries, captions, and chapters to enhance the viewer experience. Leveraging analytics and AI allows content creators to make informed decisions, enhancing future recordings and increasing viewer engagement.
Such tools are vital for creating content that effectively connects with your audience.
Summary
Recording your screen in Kumospace is fast, flexible, and hassle-free. Instead of relying on external tools, Kumospace makes it easy to record for screen, capture from screen, and save your screen recordings directly in the cloud. Whether you need to document a meeting, create tutorials, or share presentations, Kumospace’s built-in screen recorder lets you choose between recording your entire screen, a single window, or a browser tab. With options to include audio, capture the cursor, or take quick screenshots, you’ll always have high-quality content ready to share. If you’ve ever asked, how do you do screen recording during virtual meetings, Kumospace offers the simplest all-in-one solution.
Frequently Asked Questions
Kumospace stands out as an excellent choice for beginners because of its intuitive interface and innovative cloud recording features, making the screen recording process simple and efficient.
To ensure high-quality audio in your recordings, use an external microphone and select a quiet environment for recording. This combination will greatly enhance your audio clarity.
Yes, you can record your screen and webcam simultaneously using tools like OBS Studio or Kumospace. These applications provide the functionality you need for dual recording effectively.
You can share your screen recordings through secure links, by embedding them in emails, or uploading them to cloud services. This ensures easy access for your intended audience.
To protect your recordings, utilize encryption, opt for cloud storage with end-to-end encryption, and implement password protection. These measures significantly enhance your security.